Swipr - Data Cleaning
Back in part 3, we said:
Of course, pictures of beaches, food, and dogs are all common Instagram subjects, even on profiles of stereotypically self centered selfie-obsessed young twenties girls. We will come back to this point in detail later on, but for now, let's assume that each profile is pure and ideal for its category.
Now it is time to come back to that.
A bunch of Instagram photos, no matter from whose profile, are of course not pure and ideal for their category, and pictures of beaches, foods, and boyfriends abound.
This is actually a similar problem to what we might find on Tinder - people will post far more than just their picture there, often the same sets of non-face images will crop up, so this is a problem that is double worth solving.
This is just a data massaging step before we train our model, but it’s an important one.
We’re going to take all our images and run them through a face/gender/age summarizing model, and use that information to determine what categories (Like, Dislike) to load each image in as during model-training time.
An important note about this pre-filter is that we are only looking to disqualify images. The goal of this step is explicitly to not decide what is an 'OK' image. We are only concerned with what qualifies as a 'NO' image.
A New Database
Before we talk about the actual implementation of this pre-filter, we need to talk about some infrastructure.
One of the themes of this project thus far has been those of being “robust-to-failure” and “easy-to-recover from”. We take the same approach here for the pre-filter, simply because we have to go over really a lot of data. As an added bonus, the resulting database we make will be useful in constructing the dataloader for our final model training as well.
We’ll be creating a database with one table constructed like so:
CREATE TABLE `pics` (
	`path`          TEXT NOT NULL,
	`label`         INTEGER NOT NULL DEFAULT -2,
	`invalid`       INTEGER NOT NULL DEFAULT 0,
	`ages`          TEXT,
	`num_people`    INTEGER,
	`male_present`  INTEGER,
	`baby_present`  INTEGER,
	PRIMARY KEY(`path`)
);
You can see the details of how we create this database over at the sort.py
The purpose of this database is to keep track of various bits of information that we will make use of during model training.
The most salient bits are the label, num_people and male_present fields. The others are relics of experimentations that didn’t work for one reason or another.
Label Primer
The most important of the database fields is the label. A quick glossary of the label meanings is as follows:
| Label | int | Description |
|---|---|---|
| NOJUDGEMENT_INT | -1 | This image has been seen, but no judgement has been made |
| UNJUDGED_INT | -2 | This image has not been seen |
| FAIL_AGE_INT | -3 | Someone in this image is too old or too young |
| FAIL_MALE_INT | -4 | There is a male in this image |
| FAIL_NOFACE_INT | -5 | This image does not contain any faces (pass 1) |
| FAIL_INVALID_INT | -6 | This image failed to load properly |
| FAIL_GROUP | -7 | There are too many people in this image |
| FAIL_UNCHANGED_INT | -8 | This image does not contain any faces (pass 2) |
| FAIL_BASE_INT | 0 | Unusued |
All images found by sort.py start out at -2, image not seen.
We will use these status codes to crawl through the list of images as we classify and reclassify then during our pre-filter.
Face Checking Round 1 - DFace and InsightFace
For the complete implementation check out the jupyter notebook where the raw work was done.
We’re going to use a pre-trained pytorch model called DFace to scan each picture in our dataset for faces. For each face detected by DFace, we use numpy to extract the pixels within the bounding box for that face, and then we’ll hand that extracted face to a second model called InsightFace, which performs gender and age analysis.
We load the image with cv2 and send it to DFace, which returns a list of bounding boxes, one for each face found
img = cv2.imread(imgpath)
bboxs, landmarks = facedetector.detect_face(img)
then for each face found, we extract the pixels from the image given the bounding box:
faces = [extract_bbox(img, x) for x in bboxs]
And finally we run each extracted face through InsightFace's get_ga() method:
for face in faces:
    gd = genderdetector.get_ga(face)
After going through a few other custom methods we end up with an output that looks kind of like this:
This image should also explain why we abandoned using age as a useful field to filter on earlier. The idea was to filter out toddlers and babies, but depending on the photograph, it can be horribly incorrect. Unfortunately for our dataset, it fails most egregiously on Japanese faces in particular.
The most important thing about this image is that it receives an output label of -1, meaning that it passed the pre-filter without problems.
Recall that the goal of this step is to filter out pictures for being bad, not determine the pictures that are good. -1 means that it isn’t obviously a bad picture.
(although in this particular case, it would have been nice to have this classified as purikura and therefore disqualified. A project for another time, which we may be able to tackle at a later date because we did classify a bunch of Instagram profiles as being primarily purikura…)
Face Checking Round 2 - Rotations
After spending many hours watching the GPU churn checking for faces in all these images, it became obvious that there were thousands upon thousands of easily missed images where a face is clearly present but no face was detected. The sheer number of false negatives rendered a solid half of the dataset invalid.
For example:

This isn’t even the worst example. Girls with heads tilted at even a 10 degree angle would fail to be detected.
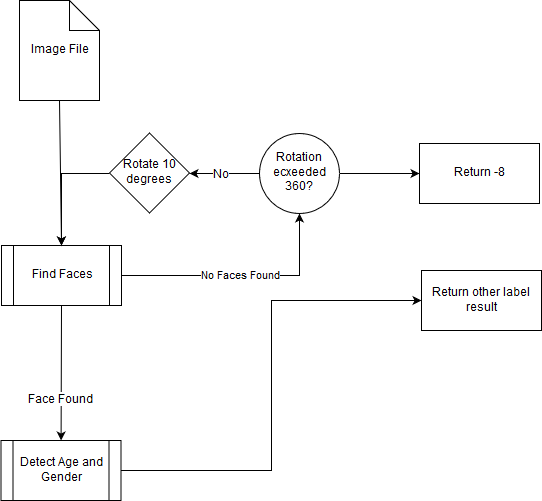
After a bunch of experiments, we settled on a method that took each picture without a detected face (label == -5), ran it through the whole process again but rotated by 10 degrees, and checked it for faces again. We repeated this process until either a face was found, or we completed a full 360 degree rotation.
As one might suspect, this drastically increased the computation time for each image, up to a worst case scenario of 3600% per image if there really was no face in it. And obviously there are a lot of images with no faces in them. No matter how one rotates a picture of a sunset, it will (hopefully) never contain a human face.
The source of the rotation finder can be found in the notebook linked above, but for convenience we post it here as well:
def findrot(img, already_rotated, d, verbose=False):
        bboxs, _ = facedetector.detect_face(img)
        if len(bboxs):
            return bboxs, 0
        else:
            while already_rotated < 360 and already_rotated > -360 and (d != 0 and d!=360):
                if verbose: print("rotating d degrees: {0}".format(already_rotated))
                img = rot(img, d)
                already_rotated += d
                try:
                    bboxs, _ = facedetector.detect_face(img)
                    if len(bboxs) > 0:
                        return bboxs, already_rotated
                except:
                    if verbose: print("lol sup")
                    continue
        return [], already_rotated
For any image that was completed the rotation and still came up faceless, we return a label of -8, indicating that it has undergone rotation and still failed.
Our face scanning architecture can be summarized with the following chart:

This process took another ~18 hours on the standard issue Paperspace machine to complete. It is a very slow process, but this technique reduced the number of so called “faceless” images in our dataset by an impressive near 50%.
Moving On
In the next post, we’ll discuss using fast.ai and ResNext50 to start the training of our actual final model.
Next Section - Model Architecture